140‐Day QuickBooks Trial Software
Installation Guide
This guide will help you install the 140‐day trial version of QuickBooks that is associated with your textbook. Depending on your textbook, the software may be available via digital download or DVD. This guide includes instructions for installing the software using both methods. Also included are instructions for toggling to the Pro edition of the software, which is necessary for some users. Be sure to check out the Common Questions section at the end of this guide.
Contents |
|
| Note! Your QuickBooks trial software is intended for use on a Windows‐based PC. The | |
software cannot be installed mobile devices using the iOS or Android operating system. |
|
Please see this page for more information on system requirements to install QuickBooks. |
Installing QuickBooks – Digital Download
If your trial version of QuickBooks is provided via digital download, you will access the software from the Intuit website.
Before you get started, make sure you have your license number and product number handy.
15‐digit license number: ___ ___ ___ ___ – ___ ___ ___ ___ – ___ ___ ___ ___ – ___ ___ ___
6‐digit product number: (QuickBooks 2014) 602 – 834 (QuickBooks 2015) 503 – 154
1.Close all running programs, including antivirus programs.
Remember to restart your antivirus program(s) after the software installation is complete.
2.Open a web browser and navigate to http://quickbooks.com/download.
These instructions use Internet Explorer. Different web browsers may behave differently.
3.Click the QuickBooks Accountant link for your version of QuickBooks.
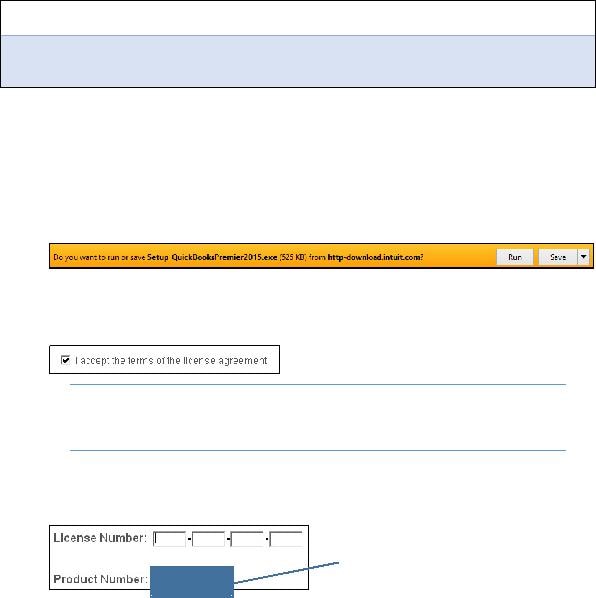
4.Choose the Run option in the download bar, and then choose Yes in the dialog box that appears.
Continue with the next step after the download completes.
5.Click Next in the wizard screen, and then click Next in the Intuit QuickBooks Installer window.
6.Click the checkbox to accept the terms of the license agreement; click Next.
Tip! If desired, use the Print link at the top‐right corner
of the window to print the License Agreement for your records.
7.Ensure that the Express (recommended) installation type is selected; click Next.
The Express installation will place QuickBooks in the default location on your computer.
8.Type your license number and product number in the provided boxes; click Next.
For QuickBooks 2014, use 602‐834.
For QuickBooks 2015, use 503‐153.
9.Click Install.
The installation can take time, so be patient!
10.Click Open QuickBooks in the screen that appears after the installation is complete.
11.If a notice regarding how QuickBooks uses your Internet connection appears, click OK.
The QuickBooks trial software is now installed on your computer.
12.Toggle to the Pro edition of the software, if necessary for your course.
T
Installing QuickBooks – DVD
If your trial version of QuickBooks is provided via DVD, simply follow these steps.
Before you get started, make sure you have your license number and product number handy.
15‐digit license number: ___ ___ ___ ___ – ___ ___ ___ ___ – ___ ___ ___ ___ – ___ ___ ___
6‐digit product number: (QuickBooks 2014) 602 – 834 (QuickBooks 2015) 503 – 154
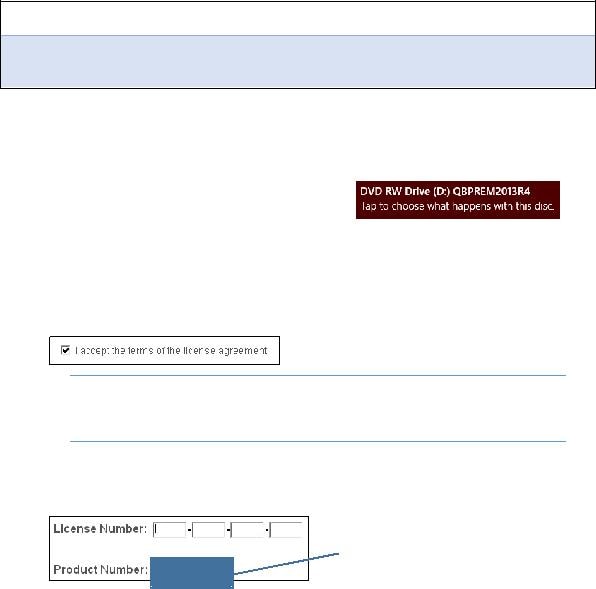
1.Properly install the installation disc into your computer.
2.Follow the step for your version of Windows:
Windows 7: Click Run setup.exe.
Windows 8.1: Tap the banner that appears at the top‐right corner of the screen and then click Run setup.exe.
3.Click Yes in the User Account Control window.
QuickBooks begins the installation, and the Intuit QuickBooks Installer window will soon display.
4.Click Next in the first screen that appears.
5.Click the checkbox to accept the terms of the license agreement; click Next.
Tip! If desired, use the Print link at the top‐right corner
of the window to print the License Agreement for your records.
6.Ensure that the Express (recommended) installation type is selected; click Next.
The Express installation will place QuickBooks in the default location on your computer.
7.Type your license number and product number in the provided boxes; click Next.
For QuickBooks 2014, use 602‐834.
For QuickBooks 2015, use 503‐153.
8.Click Install.
The installation can take time, so be patient!
9.Click Open QuickBooks in the screen that appears after the installation is complete.
10.If a notice regarding how QuickBooks uses your Internet connection appears, click OK.
The QuickBooks trial software is now installed on your computer.
11.Toggle to the Pro edition of the software, if necessary for your course.
oggle to the Pro Edition
Your trial software of QuickBooks is the Premier Accountant edition. If you are enrolled in a full QuickBooks course using a QuickBooks Pro textbook from Labyrinth Learning, you must align your software version with the textbook.
Note! If you are enrolled in a payroll course using Labyrinth’s Payroll Accounting textbook, you are not required to toggle to the Pro edition.
Before you begin, complete the first Develop Your Skills exercise in your QuickBooks Pro textbook.
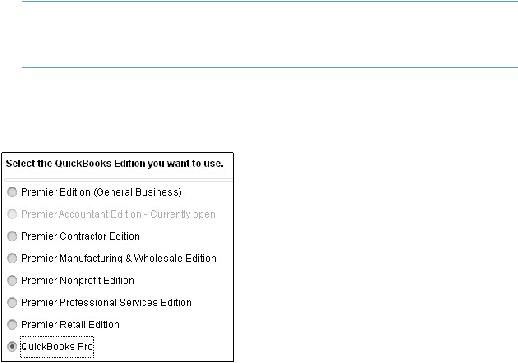
1.In QuickBooks, choose File > Toggle to Another Edition.
2.Click in the circle to the left of QuickBooks Pro and then click Next.
3.Click Toggle, and then click OK in the Close Accountant Center window.
QuickBooks will close and then reopen in the Pro edition. The title bar will show that you are using the Pro edition “via” the Accountant edition.
Cp Plus Dvr Firmware Update Better Download Pdf Hot -
Right-click the screen, log in with your administrator password, and go to the . Click on System Maintenance or Setting > System > Upgrade .
A power outage during a firmware update can permanently damage your device, causing it to become unusable.
This comprehensive guide provides step-by-step instructions on how to safely download and flash the latest CP Plus DVR firmware. 🛠️ Step 1: Identify Your Exact CP Plus DVR Model
: Plug the prepared USB flash drive into the DVR's front or back USB port. Access Menu : Navigate to Main Menu > Settings > System > Upgrade (on newer models) or Main Menu > Info > Version > Start (on older models). Select File USB Upgrade , browse for your file, and select Complete Update cp plus dvr firmware update download pdf hot
Follow these steps carefully. Ensure your DVR is connected to an Uninterruptible Power Supply (UPS) during this process, as a power failure mid-update will destroy the motherboard. Method 1: Upgrading Locally via USB (Recommended)
Before downloading any files, you must identify your specific device hardware configuration. Installing the wrong firmware version will brick your motherboard. Turn on your CP Plus DVR system. Right-click on the live view screen and open the . Navigate to System or Setting , then select Version or Info .
: Look at the sticker on the bottom of your DVR. Note the exact model number (e.g., CP-UVR-0401E1-V2). Firmware is model-specific. Right-click the screen, log in with your administrator
Searching for a “CP Plus DVR firmware update download PDF” reveals a common user challenge: the need for clear, official documentation to accompany the binary firmware file. A successful update requires three elements: the correct firmware file (usually a .bin or .img file), the official update procedure PDF (to avoid bricking the device), and a way to verify compatibility.
Before you can download any firmware, you correctly identify your DVR's model number. Installing the wrong firmware is a leading cause of device failure.
The search tells us you need an urgent, documented fix. Here is your 5-minute action plan: Select File USB Upgrade , browse for your
Before downloading or installing any files, complete these essential steps to prevent bricking your device:
Press (Windows) or Cmd + P (Mac) on your web browser keyboard. Change the print destination dropdown menu to Save as PDF . Click Save and choose your preferred local storage folder.
Navigate to the official CP Plus website or their dedicated technical support portal. Step 2: Locate the Download Center
Enter your exact DVR model number into the search bar. Download the firmware file that matches your hardware version exactly. Step 4: Extract the Files
This public link is valid for 7 days and shares a thread, including any personal information you added. This link or copies made by others cannot be deleted. If you share with third parties, their policies apply. Can’t copy the link right now. Try again later.