|
||||||
|

Kinect System requirements
You need to read the system requirements on microsoft.com (http://www.microsoft.com/en-us/kinectforwindows/) we are currently using the "Kinect for Windows" sensor (NOT v2) and hence those are the system requirements you need to look up (search on "Kinect for Windows v1.8" or go to currently http://www.microsoft.com/en-us/download/details.aspx?id=40278)
Kinect Sensor for Windows (not V.2)
Search or currently go to http://msdn.microsoft.com/en-us/library/hh855355.aspx
Kinect SW setup
Visual Studio .NET, C#, and Kinect -
STEP 1 Download latest Visual Studio with C# support from Microsoft Dreamspark (you must make an account, and get verified as student, easy but, follow directions)
STEP 2: read Microsoft Kinect Getting Started (for version 1.8) ( this will reference how to a) dowload SDK, runtime tools and setup your sensor)
Kinect Developer Site (and SW)
Developer site (note we will use kinect for windows and 1.8 version of sdk and runtime)
NOTE: currently using pervious version v 1.8 of kinect for windows sensor (not v2).
STEP 2.1 So download latest SDK 1.8 that supports that sensor
STEP 2.2 Download the corresponding runtime tools
STEP 2.3 Setup your sensor
STEP 2.4 Download the corresponding developer toolkit (this includes nice apps like Kinect Studio, again version 1.8). Make sure that you have installed the Kinect studio --this is a useful app. You will bring up a Kinect Developer Toolkit browser by going to via the start menu: Kinect for Windows SDK 1.8 -> Developer Toolkit Browser v1.8 (i.e. this might lead to the folder location of C:\ProgramData\Microsoft\Windows\Start Menu\Programs\Kinect for Windows SDK v1.8)
STEP 4: optional dowload the appropriate Microsoft Speech Platform SDK for your Kinect device (version 11 currently see URL http://www.microsoft.com/en-us/download/confirmation.aspx?id=27226) if you want to do any Speech API using Kinect.
STEP 5: Play with Kinect studio
STEP 6: Try to create using book or online tutorial a beginning Kinect application ( we will be doing in C#).
To create a C# application you need to have the following
Smj110h Custom Rom Updated Jun 2026
Before flashing any custom firmware, you must prepare your device to prevent bricking. 1. Back Up Your Data
Install the official Samsung USB Drivers on a Windows computer.
Gain control over system fonts, status bar layouts, themes, and performance profiles.
Go to the Odin options tab and ensure is unchecked. smj110h custom rom updated
This error indicates a script mismatch. Ensure you downloaded the exact ROM designed for the variant. Flashing software meant for other J1 Ace variants (like the J110M or J110F) will fail and can cause permanent damage.
If you still use your J110H as a backup or media device, this ROM is worth it. Just follow the installation guide exactly (backup IMEI, use correct partition sizes). Huge thanks to the dev keeping this phone alive!
: While official LineageOS support is not available, community-built versions based on Android 7.1.2 exist for the J1 series, though stability on the "H" variant varies. Before flashing any custom firmware, you must prepare
Connect your phone to your PC while still in TWRP recovery and transfer the downloaded and the corresponding GApps (Google Apps) .zip file to your phone's internal storage or SD card. Return to the TWRP home screen and tap Install . Navigate to and select the Custom ROM .zip file.
Stock ROMs (TouchWiz) are heavy. Custom ROMs are typically "debloated," removing pre-installed apps to free up precious RAM and storage on the J110H’s limited 1GB RAM. Updated Security Patches:
Click . Once the process completes, Odin will display a green "PASS" message. Gain control over system fonts, status bar layouts,
Swipe to confirm the flash process. Wait for it to complete. Go back to the Install menu. Select the file. Swipe to flash Google Apps. Once finished, tap Reboot System .
“Don’t try the Android 10 builds. They are broken. The ‘smj110h custom rom updated’ trick is to stick with Android 7.1.2 and install a modern launcher. Battery lasts all day.” –
Download Odin (v3.10.7 or newer) and a custom recovery image (TWRP 3.0+ optimized for Spreadtrum). Step-by-Step Installation Guide Step 1: Unlock Bootloader and Enable USB Debugging Open Settings on your phone.
Compatibility and prerequisites
A popular choice for users who want a balance between features and system lightness. It is often cited in community videos and XDA Forums as a reliable daily driver.
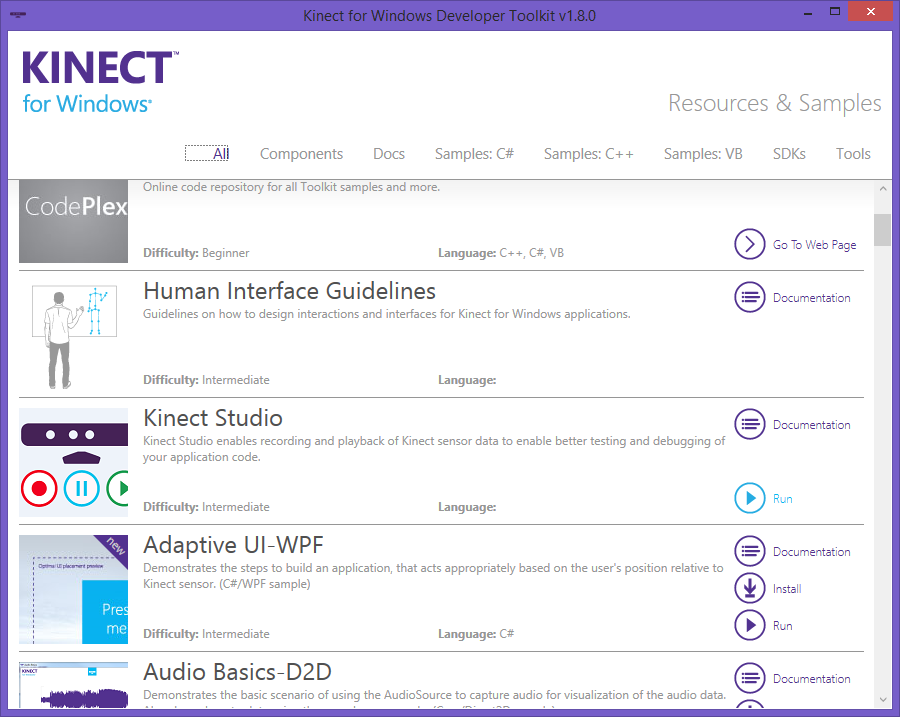
Kinect Studio
This tool lets you record data on your Kinect Studio associated with a Kinect application that is running and then save as an .XED file and play this back anytime you want through the same application as long as you have the same sensor running with it (this is because it needs the same calibration information stored with sensor).